
5 Scented Candle Mistakes That Are Wasting Half Your Wax And Your Money
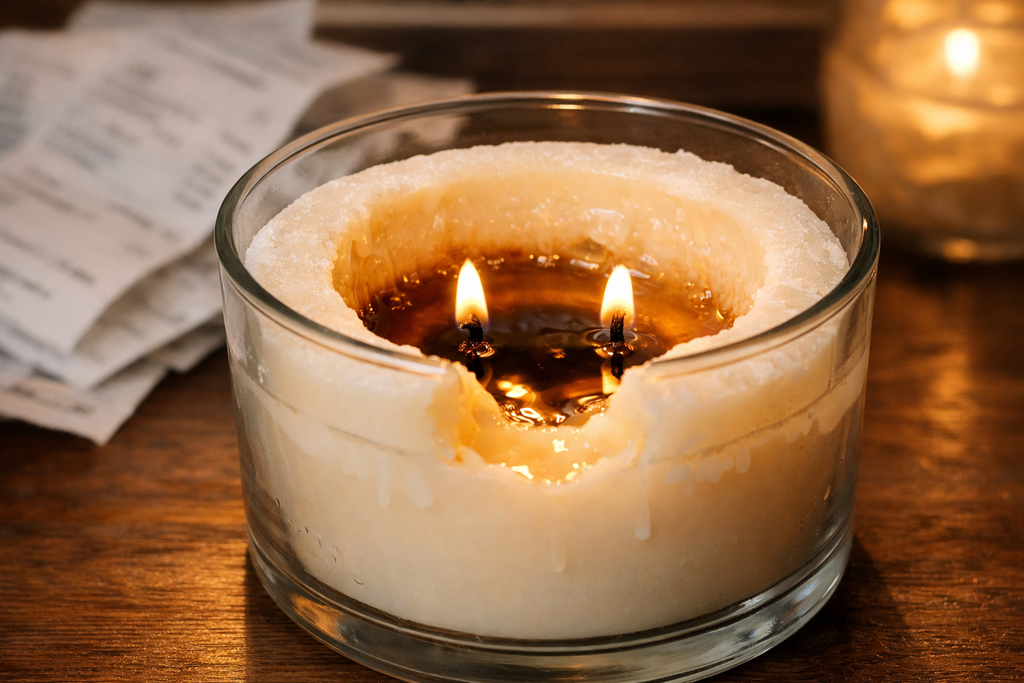
There is nothing quite like lighting a luxury candle, sitting back, and letting a warm, rich aroma fill the room. But if you have ever noticed a stubborn ring of hard wax stuck to the sides of the jar while the center burns straight down to the bottom, you know the frustration. You are effectively watching half your money go straight down the drain!
If you want to get every last hour of fragrance out of your jar, a few practical scented candle tips can completely transform how your candle burns. Here are 5 common mistakes you might be making—and the simple fixes to learn how to make scented candles last longer.
Mistake 1 Skipping the First Burn (Candle Tunneling)
Ever found an unmeltingly thick wall of hard wax around the edges and a deep hole down the middle of your jar? That annoying problem is called "candle tunneling.
Wax has a "memory. The first time that a candle is lit, the pattern for all candle burning is set! If you blow out the candle before the whole top layer of the wax has become liquid to form a full pool of melted wax, the candle will recall that thin line. On every burn after that, the flame will melt downwards instead of outwards, causing wasting candle wax with every use.
How to stop candle tunneling:
-
Allow time for first burn: Let your candle burn for about 1 hour per inch diameter for its first burn.
-
Leave the melt pool until it is full: Do not blow the melted wax until it has filled the entire pool of wax.
-
Fix early tunneling: If tunneling has already started, wrap a piece of aluminum foil around the top rim like a small dome (leaving an opening at th
Proper care makes a world of difference, especially when burning premium creations like those in our scented candle collection.
Mistake 2 Never Trimming the Wick
You can easily light your candle without giving it a second thought, but if you leave a long mushroomed wick from a previous use, you're in trouble.
If a wick becomes too long, it will absorb too much wax for the flame to consume. This will result in a large, unsteady flame that will burn too hot in the glass and unevenly. Worse still, an overgrown wick produces dark soot and distracting black smoke, which will not only spoil the air quality of your room, but will also spoil the look of your candle jar.
The Fix:
-
Practice consistent wick trimming before every burn.
-
Trim the wick down to about 1/4 inch (6 mm) using a wick trimmer, nail clippers, or a tissue.
-
Always wait until the wax is completely cool and solid before trimming to keep debris from falling into the wax pool.
Mistake 3 Burning the Candle Too Long (or Too Short)
Timing is everything when it comes to maximizing your total candle burn time. Burning a candle in short 15-minute bursts leads to severe tunneling, but leaving it burning all day is equally destructive.
When a candle burns past the 4-hour mark, the entire vessel gets excessively hot. This causes the wax to melt too quickly, causing the wick to drift off-center or drown in the liquid pool. Overheating also scorches the fragrance oils, meaning your candle will burn through its fuel fast without actually giving off a pleasant aroma.
The Fix:
-
Follow the golden rule: burn for a minimum of 1 hour (to melt the top layer) and a maximum of 4 hours per session.
-
Let the candle cool completely for at least 2 hours before relighting it.
-
If you want continuous aroma in your home all day without running the flame non-stop, this is a great habit for how to make scented candles last longer.
Mistake 4 Storing Your Candle the Wrong Way (Killing the Scent Throw)
Have you ever purchased a scented candle that was so alluring the first month, but now has become hard to notice? You may not be getting the scent throw you want from your candle because of how you are storing it.
Essential oils and light-sensitive and temperature-sensitive fragrance compounds. Essential fragrance oils evaporate directly from the top wax layer due to direct sunlight, heat, or air exposure. Further, dust and pet hair can accumulate on the wax of uncovered candles and soak up heat, smothering the wick.
Here are some helpful tips for candle storage:
-
Keep candles in a cool, dry, dark place, such as a cabinet or drawer.
-
Avoid direct sunlight, radiators, and drafty windows.
-
Use dust lids or covers when not in use to seal in the perfume.
If you love rich, long-lasting aromas throughout your living space, explore our fragrance oils collection for alternative ways to diffuse your favorite scents naturally.
Mistake 5 Blowing Out the Candle the Wrong Way
Blowing hard directly onto a liquid wax pool seems like the most obvious way to put out a flame, but it is actually the worst option.
Blowing out a flame creates a harsh burst of hot black smoke that instantly replaces your lovely room fragrance with a burning smell. It can also splatter hot wax across your furniture, tilt the hot wick off-center, or leave ash buried inside the melted pool.
Best way to extinguish a candle without smoke:
-
Use a Snuffer: Place a candle snuffer gently over the flame to cut off its oxygen supply without any smoke.
-
Dip the Wick: Use a wick dipper (or a small metal tool) to gently push the lit wick into the liquid wax pool to extinguish it instantly, then bend it straight back up. This coats the wick in wax, making it easier to light next time!
Discover the passion and care behind our small-batch designs by reading our craftsmanship story.
How to Stop Wasting Candle Wax Quick Recap
Let's get a quick summary of how to make the most from every jar:
-
Prevent Tunnelling: Use the candle long enough on the first light to melt wax to the edges of the candle.
-
Cut Wick: To avoid soot and hot flame, cut the wick 1/4” before each burn.
-
Reduce Burn Times: Burn times of 1 to 4 hours per session to conserve wax and aroma.
-
Store Effectively: Place candles in a cool, dark location to preserve the scent throw.
-
Extinguish without smoke or splatter: Use a wick dipper or snuffer; dip and extinguish the flame.
Want more expert home fragrance guides? Be sure to read more fragrance tips on our blog.
Frequently Asked Questions (FAQs)
How do you fix candle tunneling?
Cover the outside of the candle jar with aluminum foil to make a small dome, making sure the center area is clear for the flame of your candle. Allow it to burn for 1-2 hours; the heat will spread down the hardened wax buildup on the sides.
How long should you burn a scented candle?
To avoid overheating, the highest recommended burn time is 4 hours at a time, and a minimum time of 1 hour is recommended, or until a full melt pool has reached the edges.
How often should you trim a candle wick?
Candles should be trimmed before each use. Reduce to about 1/4" when completely hardened and cooled from use.
How do you make a scented candle's smell last longer?
To maximize scent output, store your candles in cool, dark environments with dust covers on, avoid burning them in drafty rooms, and limit burn sessions to under 4 hours so the fragrance oils don't burn off too quickly.
Taking care of your candles does not require a lot of effort—just a few simple adjustments to your routine! Next time you strike a match, trim that wick, give it enough time to form a smooth melt pool, and extinguish it gently. Your candles will burn cleaner, smell stronger, and last twice as long.
Ready to elevate your home atmosphere? Explore our hand-poured creations and shop our full fragrance collection today!
RECENT POSTS


27.September.2026


